This tutorial is designed for clients who are already familiar with using Apple’s Final Cut Pro. With some modification, Avid Users should also be able to create H.264 video files.
Requirements:
- Macintosh Computer
- Final Cut Pro Software
- Quicktime 7.01 or greater.
If you’re looking for a information on how to upload files, refer to this information for Uploading Digital Files
Assumptions:
- Your footage has already been digitized into Final Cut Pro.
- You know how to use Final Cut Pro.
Tutorial
The first step is to select the sequence in Final Cut Pro (FCP) that you want to export.
What to Export:
- Raw Interview Dailies – please keep each export to under 1 hour in length. If you have multiple interviews totaling more than 1 hour, split them into logical pieces.
- Finished Shows – If you’re sending a rough cut or final cut, export the entire show as one file.
- Timecode Burn In – If you want timecode on your transcript, use FCP’s timecode filter to burn the ‘Source’ timecode onto the window. (This may increase your render times.)
What to Avoid:
- Only export the portion you want transcribed! For example, if you only want 15 minutes of a particular interview transcribed, only send us those 15 minutes! If we have to reedit your footage ($5.00 per cut), it will delay your turnaround times and cost you extra.
- Long clips. If you upload a 5 hour file, expect it to take 5 times longer than if you upload five 1-hour files… Five transcribers can work on five separate files, but only one transcriber can work on one really long file.
Getting Started
In this example, we’re exporting an edited sequence.
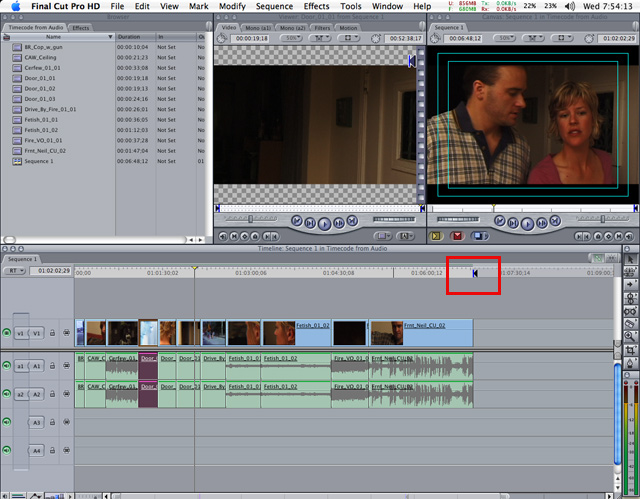
Set the out point to the end of the timeline or the point you want transcription to end. It’s best to leave about 10 seconds of black tail at the end of the file to facilitate the transcription process if possible. The OUT point is indicated in the red box in Figure 1 below.
 |
|---|
| Figure 1 |
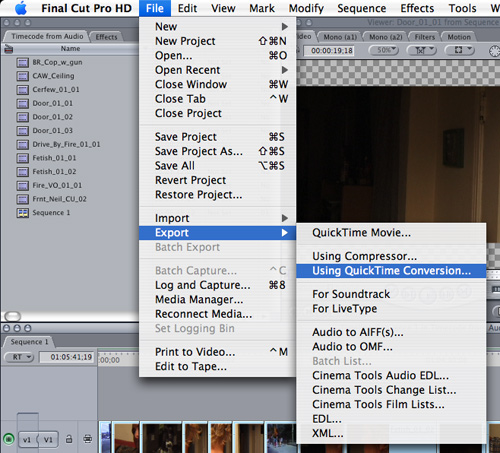
Once you’ve selected the material to export, go to File->Export->Using Quicktime Conversion, as shown in Figure 2.
 |
|---|
| Figure 2 |
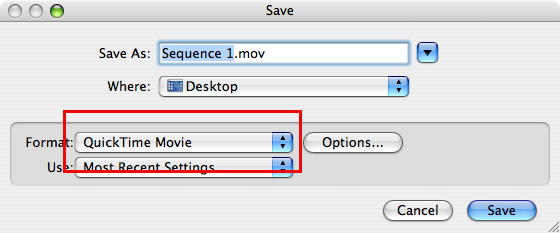
This brings up an initial screen to select the name of the file. In this case the default is "Sequence 1.mov".
From the format menu highlighted in Figure 3, choose "MPEG-4". This will change the file name to "Sequence 1.mp4".
It is very important to select "MPEG-4" and NOT "Quicktime Movie".
Please name your file in some unique way but with a name not longer than 25 characters. For example: Reel_1.mp4, Reel_2.mp4 or bob_smith.mp4, jane_doe.mp4, etc. (Use an underscore "_" instead of spaces " " if possible.)
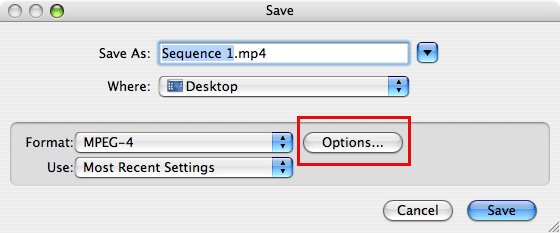
Next select the Options button indicated in Figure 4.
 |
|---|
| Figure 3 |
 |
|---|
| Figure 4 |
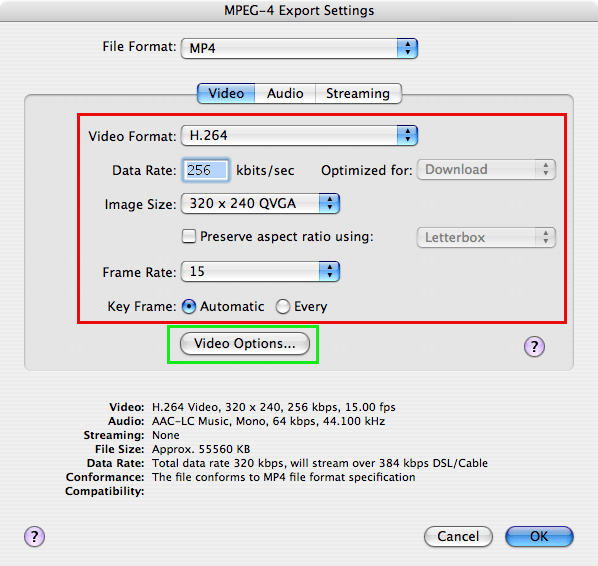
From the Options menu, set up the conversion as illustrated in Figure 5.
- From the "File Format" menu, change it to "MP4".
- Under the Video Tab, set Video Format to "H.264",
- Set Data Rate to 350,
- Set Image Size to “Custom” and set it to 320×180 if your footage is 16:9, or 320×240 QVGA for 4:3
It is important to make sure the image size is not much bigger than 320 wide and that the data rate is less than 500kbit/second. If you upload full resolution files at high data rates, you run the risk of you upload not completing plus extended turnaround times as we would then have to reconvert the file once it did arrive.
At our recommended data rates, one hour of footage will be approximately 132 MB. (On a DSL line rated at 256kb/s UP, upload time will be approximately 90 minutes per 60-minute file.)
 |
|---|
| Figure 5 |
Once the main video settings are correct, select the "Video Options" highlighted in green on Figure 5.
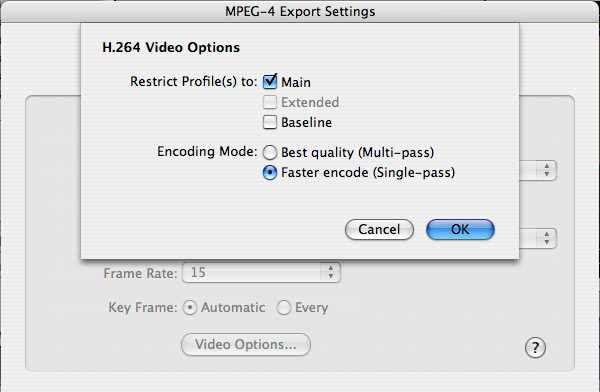
The H.264 Video Options sub-menu should be set as follows (Figure 6);
Set Restrict Profile(s) to "Main" and Encoding Mode to "Faster Encode (Single Pass)". Click "Okay" when done.
 |
|---|
| Figure 6 |
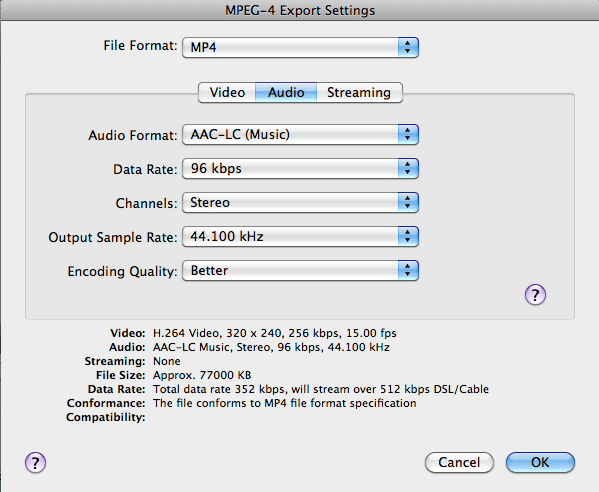
Next, select the Audio Tab and adjust the settings as follows. (Figure 7).
Set Audio Format to "AAC-LC (Music)", Data Rate to 96 kbps, Channels to "Stereo", Output Sample Rate to 44.1khz and Encoding Quality to "Better".
- Use only Stereo or Mono. Please do not create 4 channel quadrophonic AAC files (C L R C).
- Do Not use "MPEG-4 Low Delay AAC". This audio format is not compatible with most machines!!
 |
|---|
| Figure 7 |
Click "Okay" to exit the Video Options settings. This will take you back to the screen shown in Figure 4. Click "Save" to start the rendering process.
Rendering speed is highly dependent on processor speed.
After conversion, upload the .mp4 file to our servers.