Digital audio provides many advantages for transcription. Better sound quality, decreased turnaround time, and no shipping costs. If everything is done right…
This tutorial is designed for clients who are already somewhat comfortable with converting analog audio to digital audio. It assumes that you have already digitized your audio.
- Skip to Macintosh iTunes Tutorial
- Skip to Windows iTunes Tutorial
Please keep in mind that simply converting poor sounding analog to ‘digital’ will not make it sound better than the original analog sound.
If you’re looking for information on how to upload digital files, please use our Uploading Digital Files tutorial.
Our preferred format for digital audio files is MP3 using the following specifications. We can also handle most other digital formats, but MP3 is preferred.
- Stereo Channels @ 128kbit/second
- 44.1 khz sample/frequency per second
Please name your file in some unique way but with a name not longer than 25 characters. For example: File_1.mp3, File_2.mp3 or bob_smith.mp3, jane_doe.mp3, etc. (Use an underscore "_" instead of spaces " " if possible.)
iTunes is available for both Windows and Macintosh. iTunes is available for download here. (Comes pre-installed on Macintosh.)
iTunes Tutorial for converting audio to MP3 for transcription.
Macintosh OS X – iTunes version 11.0 or higher
If you’re using an older version of iTunes, click here.
The normal uncompressed audio format on Macintosh systems is call AIFF. If you’re exporting from Final Cut Pro or Avid, you will most likely end up with an AIFF file. AIFF files are unsuitable for uploading as they are EXTREMELY large!!! 600MB for 60-minutes of stereo audio
Using iTunes, we can create a 60-minute file that is only 28MB but sounds identical to the original AIFF. This will upload 21x faster!!
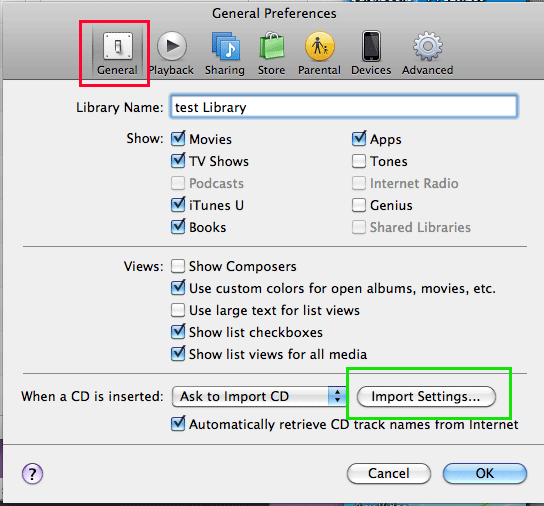
In iTunes, open the "Preferences" menu found under the iTunes Menu. Next select the ‘General’ Tab indicated in Red in Figure 1. Then click the "Import Settings…" button indicated in Green.
 |
|---|
| Figure 1 |
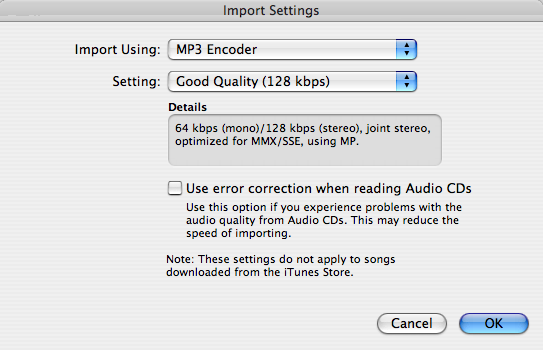
A new window will pop up as shown in Figure 2 below. Select "MP3 Encoder" from the "Import Using" pull down menu. Then select "Good Quality (128 kbps)" from the "Setting:" pull down menu. Click ‘Okay’ to save your new settings.
 |
|---|
| Figure 2 |
You are now ready to convert your AIFF or WAV audio files to MP3.
Add the audio file you want to convert to the library and then select it.
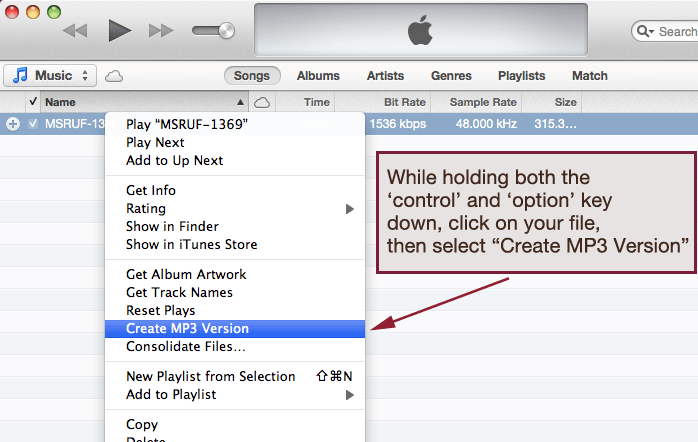
For iTune version 11: Hold down the ‘control’ and ‘option’ key and click on the file. Then select "Create MP3 Version" to start the conversion. (Figure 3a)
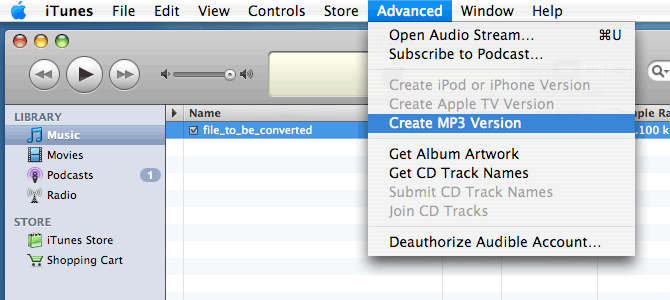
For iTunes version 8 to 10: Use "Create MP3 Version" from the Advanced Menu. (Figure 3b)
 |
|---|
| Figure 3a – iTunes 11 |
 |
|---|
| Figure 3b – iTunes 8 thru 10 |
After conversion, upload the mp3 to our servers. If you need to locate the file, "Control-Click" on the file name and use "Get Info" to determine its location. Be sure to upload the ‘mp3’, not the original uncompressed file!!!
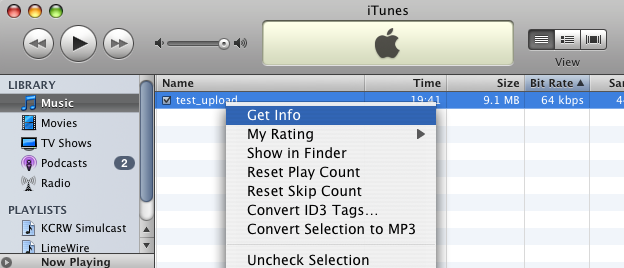 |
|---|
| Figure 4 |
The "Where" in Figure 5 is the location of the newly created MP3 file. Your location will be different than the one indicated in the example.
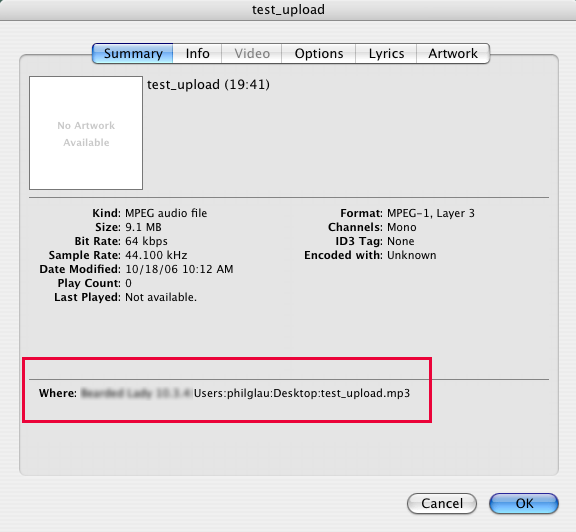 |
|---|
| Figure 5 |
If you found this tutorial helpful, please consider sharing it.
Windows Tutorial for using iTunes to convert audio to MP3
Download and install iTunes if you haven’t done so already. iTunes is available for download here.
Open iTunes, set the view to "Song View", drag the file to be converted into the window.
 |
|---|
| Figure 1-W |
We also recommend adding a view by file kind option to help keep your WAV files clear from the MP3 files:
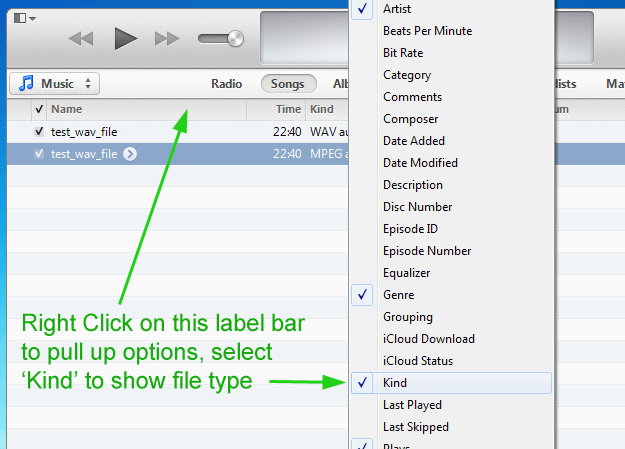 |
|---|
| Figure 1b-W |
Then go to the preferences menu. (Figure 1-W)
This will bring up a Preference menu like Figure 2-W. Select the ‘General’ tab. Next, select "Import Settings" shown in Green below.
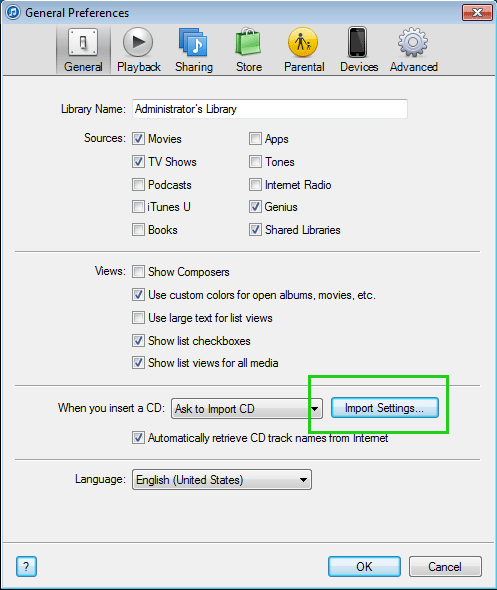 |
|---|
| Figure 2-W |
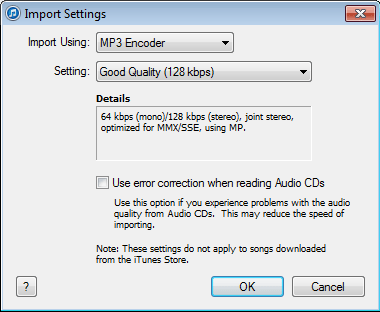
This will bring up the MP3 Encoder settings shown in Figure 3-W below. Select "MP3 Encoder" from the Import Using menu
For transcription purposes, the Good Quality setting of 128kbps is sufficient. Click Okay to save the settings.
You are now ready to convert your audio files to MP3.
 |
|---|
| Figure 3-W |
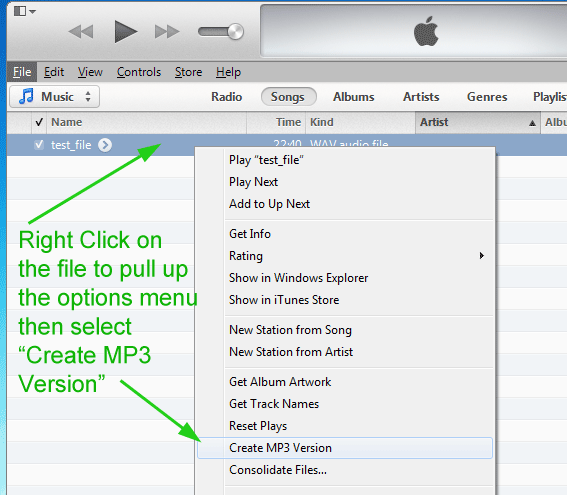
Add the audio file you want to convert to the library if it’s not already there and then ‘select’ it. To access the conversion tool, Right-Click on the file to pull up an options menu and then select Create MP3 Version. (Figure 4-W)
If you have multiple files to convert, you can select all of them to begin with and then use the Right-Click method to convert the entire batch.
 |
|---|
| Figure 4-W |
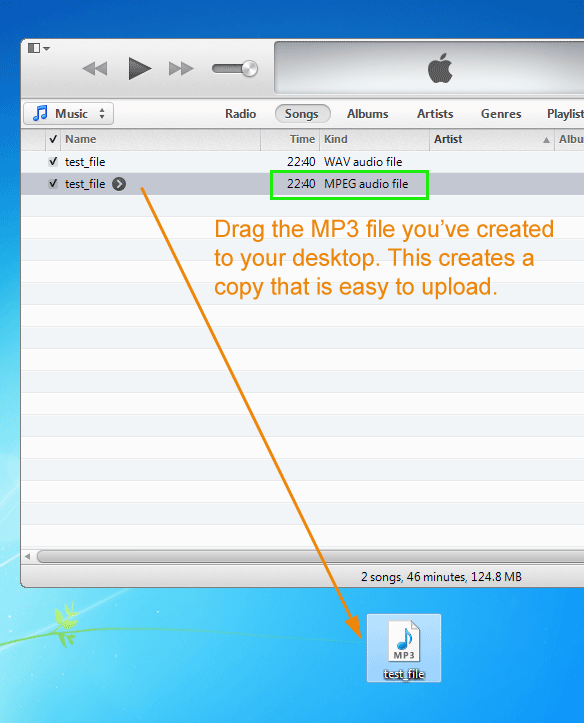
After the conversion is done, you upload the MP3 files to our server to begin your transcription order. We recommend ‘dragging’ the file from iTunes to your desktop for easy access.
 |
|---|
| Figure 5-W |
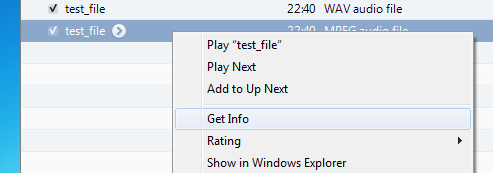
The other option is to navigate to your iTunes library and select the files from there. If you don’t know where the MP3 file is, you can locate it be ‘Right-Clicking" on the file names in the library and selecting "Get Info" or just hitting "Control-I". This will See Figure 6-W
 |
|---|
| Figure 6-W |
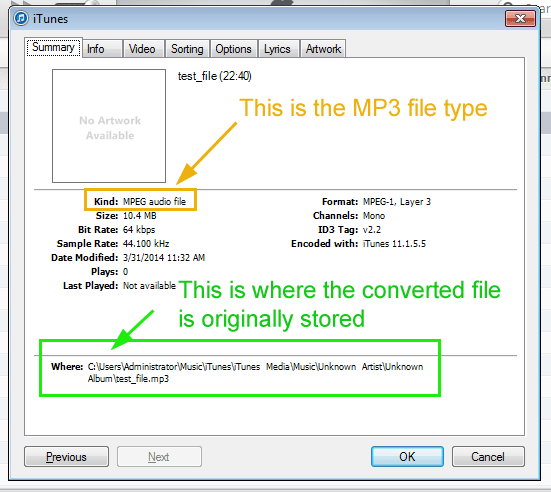
This will bring up a file info screen. Since the MP3 file is named the same as the original file, this is a good way to figure out which is which. In Figure 7-W, the path to the newly created MP3 file is highlighted in Green. (Your actual location may be different.). The format should be listed as "MPEG-1, Layer 3" and the format will say "MPEG audio file"
 |
|---|
| Figure 7-W |
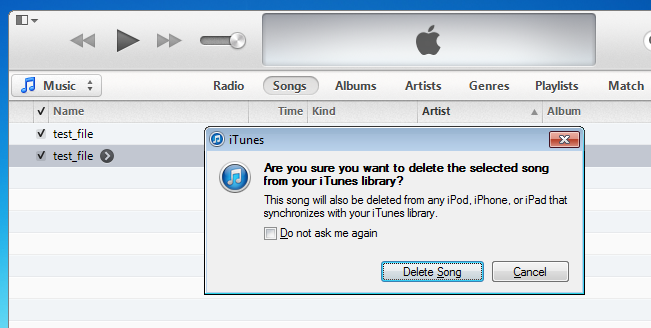
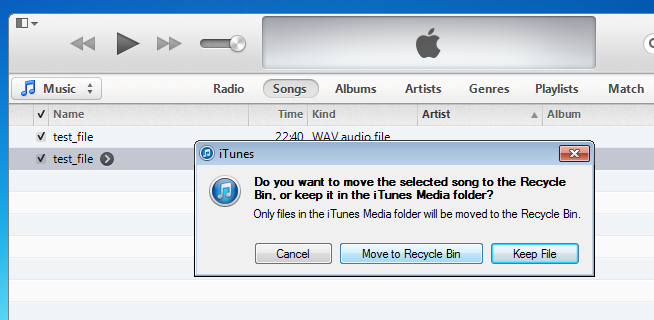
Once you are done with uploading the file, you can optionally delete it from the iTunes library. (Be sure to save your original files in a secure location!). The first step is the remove it from the Library, and then, if you want to also move it to the Recycle Bin
 |
|---|
| Figure 8-W |
If you opt to move the file to the Recylce Bin, it will be deleted from your computer when you empty your Recycle Bin.
 |
|---|
| Figure 9-W |
Macintosh OS X – iTunes version 7.0 or lower
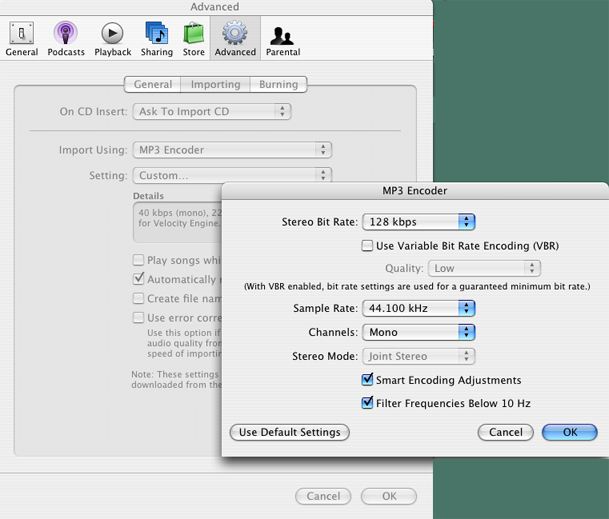
Open the "Preferences" menu found under the iTunes Menu. Next Select the ‘Advanced’ Tab. Select "MP3 Encoder" from the "Import Using" pull down menu. Then select "Custom…" from the "Setting:" pull down menu. You should see a screen that looks like Figure 1.
 |
|---|
| Figure 1 |
Set the encoder settings to: 128kbps. Turn off "Use Variable Bit Rate Encoding (VBR)". Set the sample rate to 44.100 kHz.
Since most transcription is just one track of audio and not truly Stereo, select "Mono" for channels. If for some reason you believe that you have two distinct channels of sound, or if you are putting audible timecode on one of the channels, use Stereo instead. Our experience is that Mono works fine 95% of the time and the file will be only 1/2 as big as a Stereo file.
Turn on "Smart Encoding Adjustments" and "Filter Frequencies Below 10Hz". Click "Okay" to close the MP3 Encoder settings. Click "Okay" again to close the Preferences window.
You are now ready to convert your AIFF or WAV audio files to MP3.
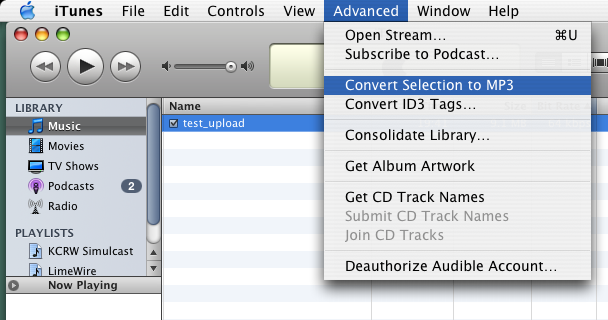
Add the audio file you want to convert to the library. Select Convert from the Advanced Menu. (Figure 2)
 |
|---|
| Figure 2 |
After conversion, upload the mp3 to our servers. If you need to locate the file, "Control-Click" on the file name and use "Get Info" to determine its location. Be sure to upload the ‘mp3’, not the original uncompressed file!!!
 |
|---|
| Figure 3 |
The "Where" in Figure 4 is the location of the newly created MP3. Your location will be different than the one indicated in the example.
 |
|---|
| Figure 4 |